
Basic configuration of computer embroidery
1. Computer embroidery machine operation management personnel, computer embroidery pattern designer, computer embroidery production personnel;
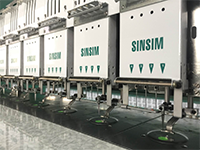
2. Computer embroidery machine, filling needle machine, thread string-divider, bottom string-divider, cut-off tool
3. All kinds of embroidery pieces, cloth
4. Pattern design software and pattern
5. Colorful face line, bottom line, line oil, wire wax
6. Various types of embroidery needles, carved hole needles, scissors, open - bit knives
7. Paper of various specifications, hot melt adhesive, water soluble, wax paper, oil paper
8. Different viscous double-sided adhesive
9. The spray adhesive required for the cloth embroidery
10. Nets required by embroidery and production
Work order of computer embroidery
1. Make sample pattern (EMB)
2. Input the DST into embroidery machine
3. Set various parameters for embroidery
4. Arrange and debug the tension of the bottom line according to the color sequence
5. Open reasonable embroidery position on the net and use double-sided adhesive
6. Pull the interlining (506#+ stencil+508#tighten)
Distinguish up and down, front and opposite of cut piece and know swing line
7. The pull rod to the right is the boot embroidery, Speed 700r per minute
8. The pull rod left is the shutdown, the continuous left is the back pin, and then the boot is the embroidery machine to confirm the embroidery machine head for the bright red light
9. After finish, the frame should towards to operating personnel direction and put away cutting piece
10. Repeat 6、7、8、9、10 and production again and again
Common quality problems of computer embroidery
1. Thread color error; color difference
2. Angle wrong, position wrong: Not parallel, asymmetry,
3. Front and opposite wrong
4. The wool and the pattern are wrong
5. Fabric direction and pattern are wrong
6. The pattern is not on the right position
7. It is not stable when make bottom line
8. Loose threads and needles are not tight
9. Pulled thread or yarn
10. Cutting piece and pattern wrinkle
Embroidered cutting needle hole too big, drop wool, glue paper so glue that tear cut sheet underlining
11. Embroidered cutting piece shrink too much
12. Often break line and there is too much thread
13. Often break needle and cutting piece
14. Oil pollution
15. Don't wrap the embroidery thread around the needle
16. When two or more colors appear in the same section, do not mix
17. It is not possible to have the broken place on the cloth embroidery
18. Don't be too tight when packing embroidery cloth or the cutting piece will shrink
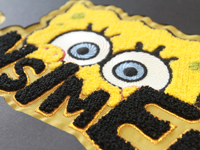
The well-finished embroidery products should look like this
1. The bottom line is smooth and the product looks smooth and flat. The bottom line should account for a third of the total width of the pin.
2. The application of pattern needle should be proper and the line should be in the good shape.
3. The front line should be cut clean, and the bottom line should keep 5-8mm after tear off the paper and the wax paper
4. Keep the line clean and no stain
5. Color line, position, front and back, the pattern should be correct by referring sample
6. It should check the rationality and perfection of pattern after finish design to make sure the delivery time and product quality.
6-1.Pattern angle, horizontal, middle and vertical
6-2.The wholeness of the pattern and the proportion of embroidery
6-3.The rationality of the intercolor sequence of embroidery objects
6-4.The needle of the pattern and the thickness of the pin and the density of the spacing of the needles
6-5. Check whether the needle points of the pattern and its position are consistent
6-6.Stitch angle of embroidery object
6-7.Properties of an embroidered object and the cutting line and connecting condition between embroidery objects
6-8.Looseness of needle close when the embroidery is finished
6-9.Remove the stitch length less than 0.5mm in the pattern to reduce the chance of breakage in embroidery production
6-10.Fully consider the nature of cutting piece (plush length, fabric elasticity, fabric thickness) and the relationship between embroidery pattern; Use the fewest stitches to express the best embroidery effects
Design of pattern information and process
1. Print out colored computer embroidery pattern drawings, which gather many information of the embroidery patterns, such as date, customer name, pattern number, disk number, pattern needle, line color, line number, color order and pattern position
2. Indicate specific considerations of the pattern
3. Every embroidery product must have production sample signed by the quality control department
A detailed list of embroidery patterns
Number, product name, embroidery name, pattern number, pattern needle, color line, time/20 piece, remark
The maintenance of embroidery machine and placement of materials
1. Care for plant machine equipment and make refueling, maintenance and cleaning timely according to machine operation procedures
2. The machine and workshop should be cleaned before 5-10 minutes day-off
3. Familiar with the "5S" operation procedure; The materials should be arranged in a neat and orderly way and should not block the fire control channel; Material labels should be clearly understood; Where are the materials used to be taken and then where to put the materials in a timely manner
Requirements for employees
1. Love your job and study professional skills to improve production quality and quantity, and keep in mind the quality policy and quality objectives of our factory; The inspection qualification rate of finished products shall be above 97%.
2. Define your job responsibilities. Don't do anything unrelated to work. Realize personal highest potential and realize self-worth.
3. You must have strongest team sense of honor and team spirit.
4. Obey the management; wear uniform; have sense of time.
5. Safe production to ensure the product quality; Do not operate machine when the machine is operating; Non-staff must not operate without authorization.
6. After line finish, you should ask “yes or no” and start to produce when you get “yes” from another operator.
7. There must be no questions when staff shifts work, such us position, line color, pattern and number.
8. In case of emergency, such as power failure, abnormal ringing machine, crash etc., Please timely report to the management personnel on duty. You can't make an illegal operation to make unnecessary losses.
Basic operating instructions for computer embroidery
1. Put line: The embroidery thread that must be prepared in order of color; the color sequence should be arranged on the adjacent needle bar in order to save the time of production.
2. Threading: Pass through the corresponding lead channel in sequence from top to bottom; There must be no mistakes; The length of the broken thread should be 3 to 5 seconds; The thread should remain about 175px long.
3. Wiring: It should be pulled out of the pinhole with a line after the previous line.
4. Adjust line: The pull of the bottom line should be moderate and smooth. The bottom line should not be too loose or tight, which will affect the appearance of the product.
5. Stick tape: operate quickly according to the method that technician teaches, away 3mm from the pattern. Glue paper with strong stickiness should be appropriate to wipe the line wax.
6. Change bottom line: all the machine should be changed bottom line when the second line have not bottom line, bobbin on left hand, bobbin case on right hand. The bottom line should be put in the shuttle case clockwise. you can hear a crisp sound to make sure it finished. The bottom line should be pulled out about 125px, so that it can be hooked.
7. Pull the interlining: It should be done by two people in a coordinated operation.
8. Divide bottom line: The tightness of the bottom line should be moderate, not too loose or too tight.
9. Change needle: Pay attention to the type of stitched needle. The stitching of the needle should turn to the operator side, then turn right about 3-5 degrees.
10. Put cutting piece: the cutting piece should be placed naturally, avoiding wrinkling and shrinking.
11. Spray adhesive: First shake the spray in the flask, and spray about 8-10 times in the distance of 625px, no more no less.
12. Stick applique: it should be placed natural according to contour line.
13. Clean applique: clean the extra applique according to the groove of applique
Others:
1. The production capacity of an embroidery product should be a cycle of embroidery products(20 piece per car).
In this embroidery cycle, the number of product needles divided by the machine speed will also include drawing paper park, pendulum, thread cutting, backframe work, and production of machine shear line change color, mobile embroidery frame, change the bottom line, paste cloth will occupy a certain amount of time. In addition, the product of every other type of production can also be used for a certain amount of time, such as puncture placement, parameter setting, cutting and embroidery position, double-sided tape, and tension of adjusting the base line.
2. Generally, it is not suitable to embroider on the front an back position when the needles are less than 1200 needles or the production is less than 2 minutes. However, if the position of the pattern is not strict(not parallel), or the staff increases, it can embroider.
3. The speed indicator of the machine shall be subject to the thickness of the cutting sheet, the size of the glue, the size range of the pattern, the type of stitch, the cloth embroidery.
4. The calculation of needlework is usually calculated in this way: The dosage of 1 embroidery thread can be embroidered with 550,000 needles - 600,000 needles: The number of colored needles of an embroidery pattern multiplied by the number of PO divided by 550,000 or 600,000, and then get the quantity of embroidery of every pattern. (Depending on the thickness of the sheet and the length of the stitch)